The process of setting up the frame pool greatly affects its stability during filling and using. There are several things you should take into consideration when assembling your pool. You can see some of them below:
General information
Level ground
- Make sure that the site of pool set-up is not tilted in any way.
- Make sure there is enough space around the pool. Leave at least 1 m of free space around the pool – for the metal frame (supports) and accessories (such as filtration). In addition, ensure you have enough space to comfortably use the pool.
- Make sure that the site on which the pool will be placed is level.
- To avoid potentially damaging the pool, remove all stones, twigs and other sharp objects.
- Only place the pool on a hard surface such as garden tiles to ensure that the surface can easily bear the weight of the filled pool.
- Soft, sandy, or unstable surface will cause the structure to sink, thus negatively affecting the stability of the entire pool.
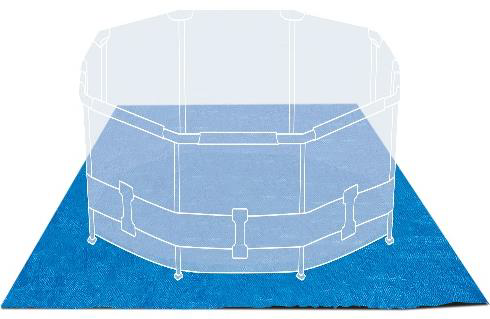
Pool mat
To avoid damaging the bottom of the pool, always place the pool on a mat. Most pools have the mat included. If not, you can place any fabric sheet under the pool.
Unpacking the liner and frame
- At least two people should set up the frame pool
- Lay out the liner so that it is exactly in the centre of the mat and there is even amount of space around the edges
- Place all parts of the frame around the pool liner
- Attention! Do not drag the pool frame or liner on the ground as you could damage it.
- Do not pull the pool liner by its sleeves, fastening bands, or pool straps.
Sliding the frame into the liner
- Leave the pool liner in the sun for a while to allow the PVC to soften slightly – this is a very important step. The frame will slide into the liner more easily..
- Before sliding the frame into the sleeves, spray it with talcum or body powder to prevent the frame and liner from sticking to each other as much as possible during warm days. This will also simplify the later removal of the poles from the sleeves when dismantling the pool at the end of the season.
- Insert the horizontal bars of the frame into the sleeves first, then fit the T-joints, and then corner pieces. Finally, attach the legs and side supports.
Filling the pool with water
- Before filling, ensure that the drain valve is properly closed on the inside and outside of the pool liner.
- Fastening bands, U-supports, and/or vertical legs should be fully extended and straight.
- Fill the pool to 3 cm. Check again for water leaks. Ensure that there is no significant difference in the water level at one end of the pool or the other.
- The pool bottom should be as flat as possible – you can eliminate the folds of the liner by pushing them away from the centre of the pool towards the outer edge. You should do this barefoot.
- If there is no water leak and the bottom has no folds, fill up the rest of the pool with water. Fill the pool up to the solid-colour sleeve. During the filling process, it is important that you adjust the frame, as necessary. Continuously check that the fastening bands are still stretched and straight and that the supports/legs are in the correct position.
- When the wall with horizontal beams tilts inward, keep filling with water. Due to the pressure applied by the water, the beams straighten themselves into the correct position right before the pool is fully filled.
Additional information:
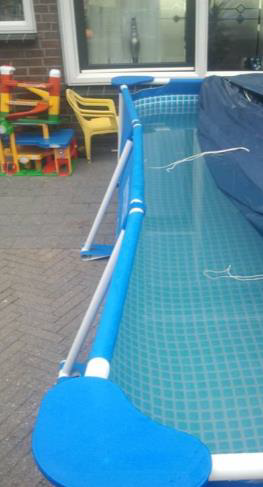
Fixing bands, side supports, and legs
- Make sure that the fastening bands are fully stretched and straightened along their entire length.
- Check that the side supports are at the correct angle and the pool legs are in straight (perpendicular) position.
- Regularly check these parts and their positions during the filling of the pool.
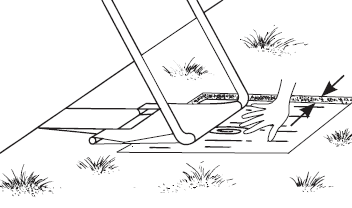
Pad under the “U” support
- If the pool is not placed on concrete, support the “U” piece with a wooden board (or use another solid board, such as a thick garden tile). The pad prevents the supports from slipping and sinking into the ground. The sinking of the frame may lead to deformation of the pool or even its collapse!
- Make sure that the size of the pads is at least 34 × 34 cm so that they can support the entire side of the “U” support standing on the ground.
- Always bury the pad in the ground so that the bottom of the pool is level with the top of the pad. IMPORTANT!
- If the pads are not dug into the ground, the supports will be placed higher than the bottom of the pool. This will fundamentally affect the stability of the frame and the support may bend or even collapse, leading to deformed or even completely collapsed pool.
Corner piece
The pool is designed so that the corner pieces can be moved. The pool frame thus better absorbs the pressure generated when the pool is being used and the water sways against the sides. All corner pieces must therefore be loose (movable). If the corner piece is stuck:
- Push the corner piece inwards until the piece releases with a ‘click’.
- Make sure the pool is set up correctly according to the user manual.
The set-up procedure is described in the user manual.